Appointment-Pro Premium: The appointment Pro module extends its power by allowing Class bookings, Manager/Provider control booking from mobile.
Price: 1-year support & updates – 99€
Note: Before installing this module you need to install Appointment-Pro Module first.
Class Manage & Add
![]()
Appointment Pro – Add Class
By classes tab you can manage the exiting classes or add the new classes.
Add Classes
From here you can add the new Classes of your business.
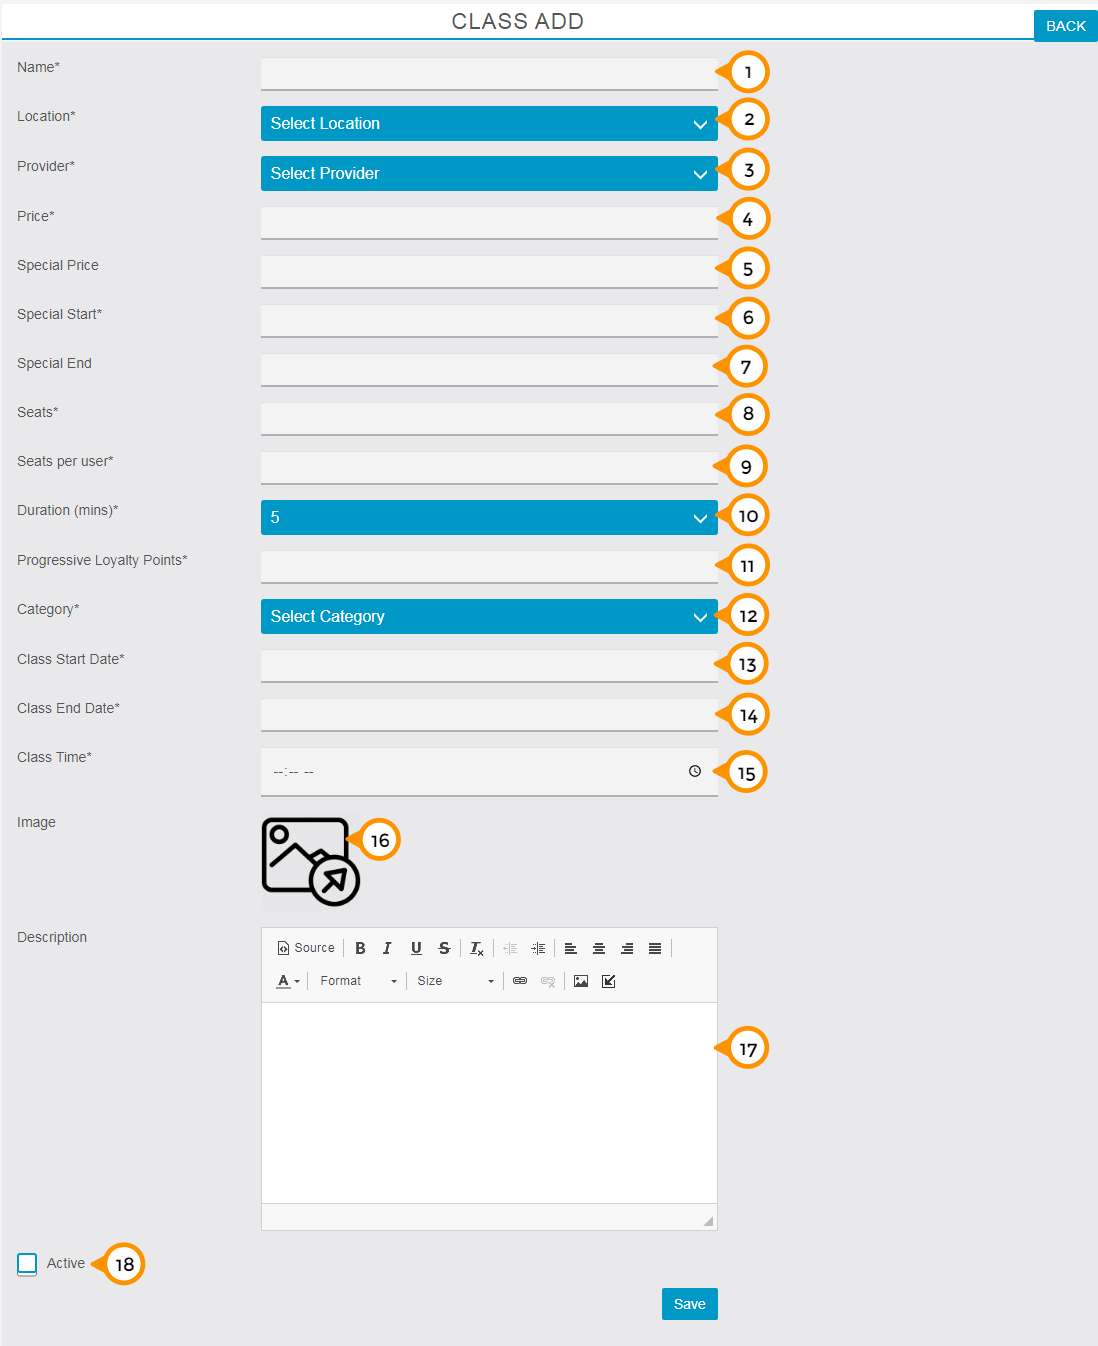
1) Here you need to enter your class name.
2) Here you need to select your location for class delivery from the drop-down menu.
3) Here you need to select the provider for class from the drop down menu.
4) Here you need to enter the price of the complete class or complete course of the class.
5) Here you can mention the special price for the offer.
6) Here you can mention the start date of your class offer period.
7) Here you can mention the end date of your class offer period.
8) Here you need to declare the available seats for class.
9) Here you need to mention seats per user means how many seats you want to sell at a time.
10) Here you need to mention the class duration for each session.
11) Here you need to mention the progressive loyalty points you want to transfer on each successful service delivery.
12) Here you need to select the category of your class.
13) Here you need to mention the date on which you going start to deliver the class.
14) Here you need to mention the date on which class will end.
15) Here you need to mention the daily class time on a particular location.
16) From here you can upload the image of the class.
17) Here you can share the details and course contents of the class.
18) By Check/Uncheck on the ‘Active’ check box you can enable or disable the particular class in the app.
Manager/Provider control booking from mobile
In App Booking Management (Mobile Control) feature: With this feature your manager and service provider can directly manage their bookings directly from application. You just need to do some following settings in the backend from admin account.
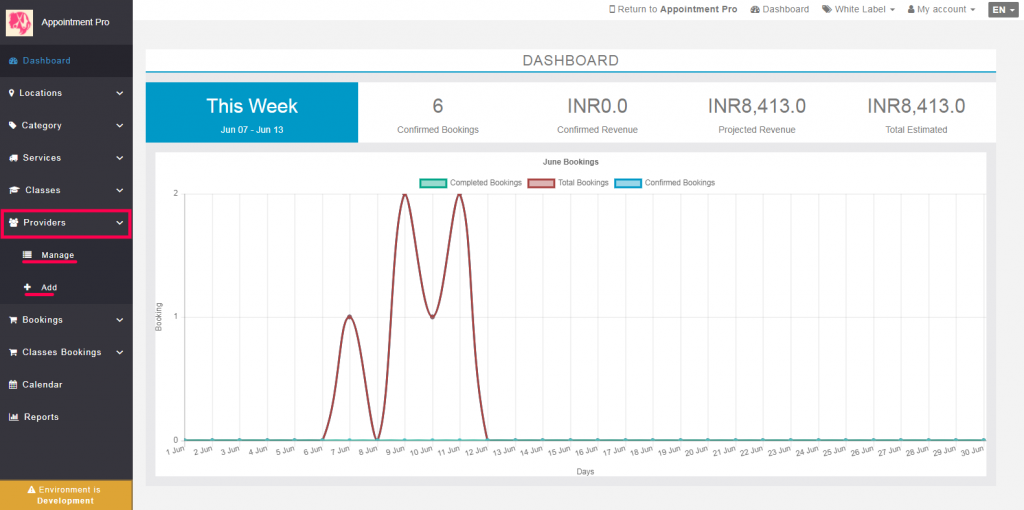
1) Very first you need to access Appointment Pro feature and need to click on Dashboard next the new tab will be open in your browser.
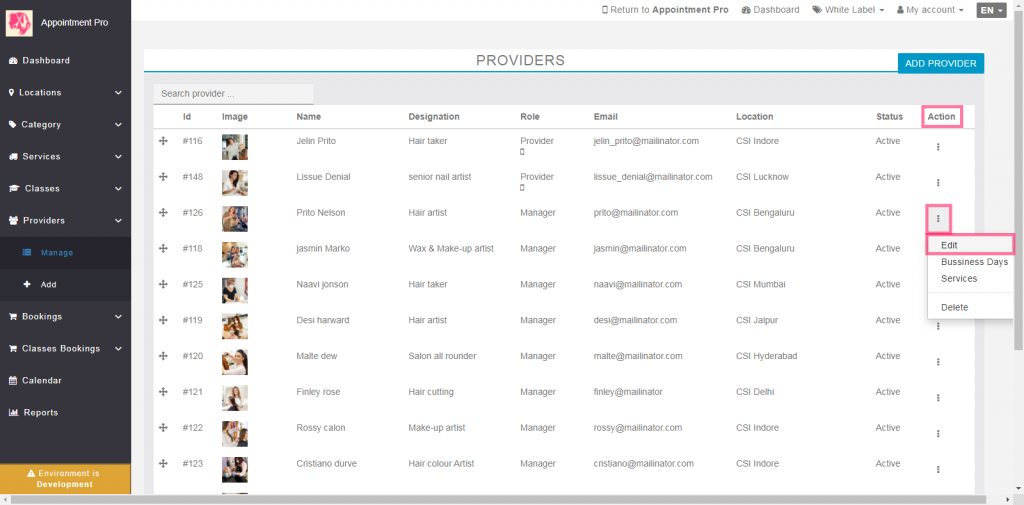
2) Then click on the Providers tab in the left-hand side menu bar next click on the manage sub-menu if you need to edit the existing provider else click on Add for new provider or manager.
As we click on the Manage tab we can see the list of providers included manager as well as provider as a job role. We need to click on three dots under the action column. Then click on the edit option in the menu.
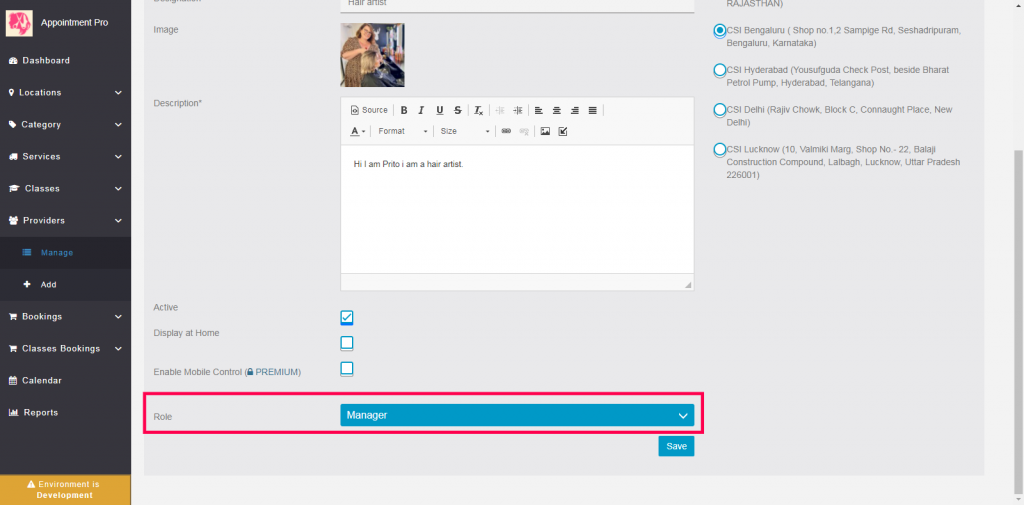
after click on edit option you need to locate “Enable Mobile Control” option under provider info page. By checkmark on “Enable Mobile Control” check box, you can ACTIVATE and DEACTIVATE the feature.

The small mobile icon is indicating “Mobile Control” is ACTIVATED for the particular provider.

Recommended selecting the role of the provider carefully because if you select the Manager as a role of your provider can manage all the bookings of the particular locations. If you select the provider as a role of your provider can manage only relevant bookings of the particular provider only.
Provider’s mobile setting
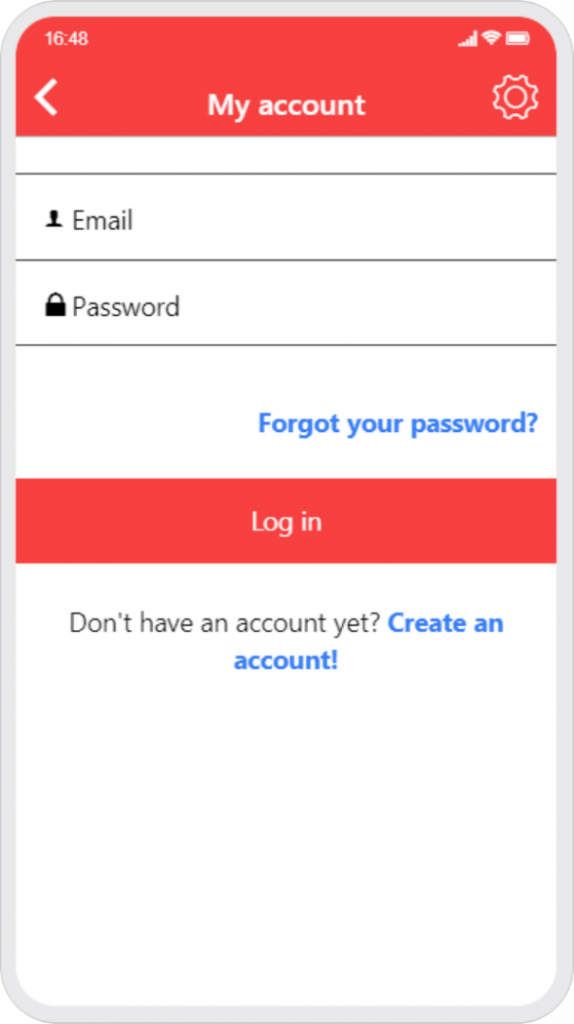
1) Provider needs to log in with registered email id if in case of provider try to access the first time he needs to register by click on create an account link with the same email id. If in case it showing an email already registered, please regenerate the password by click on forgot your password link.
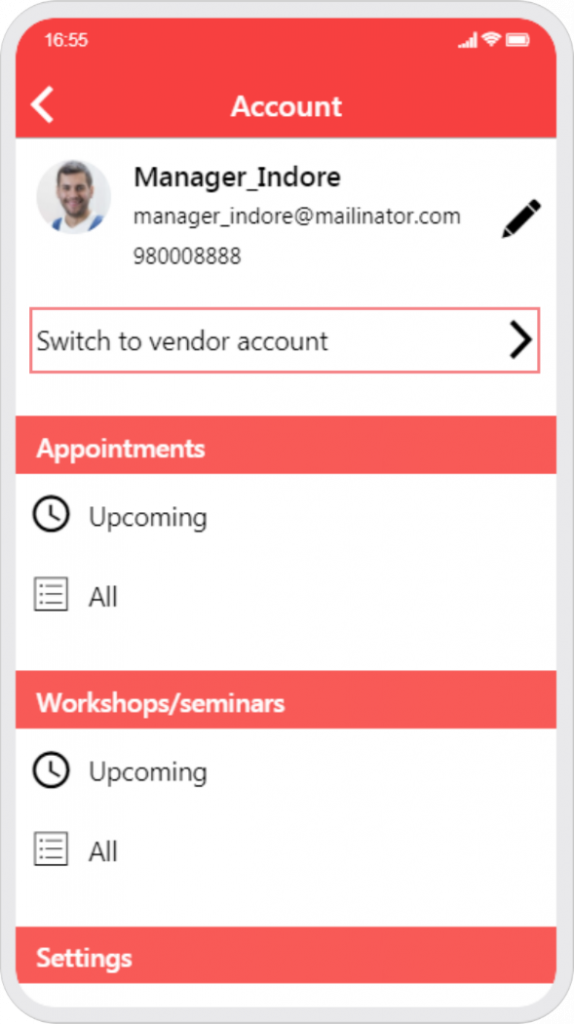
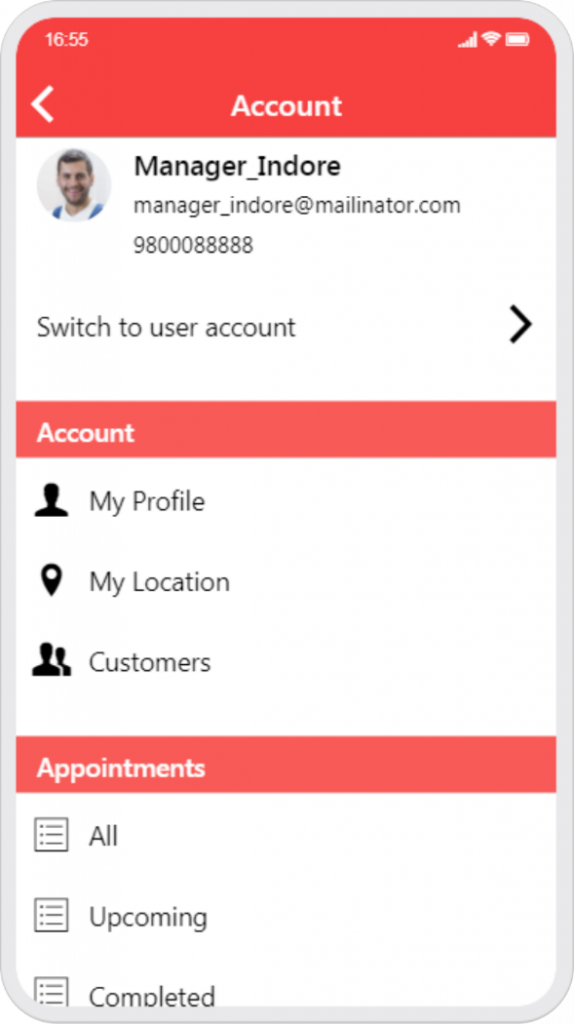
2) After login needs to click on Switch to vendor account to view and manage the bookings.
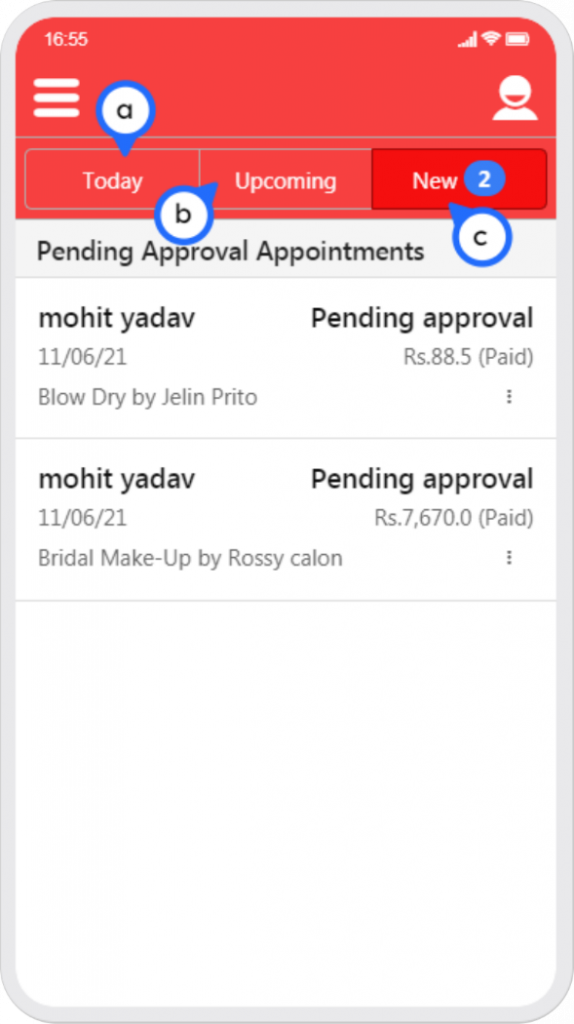
3) after switching to a vendor account you can see three tabs for different types of booking info.
a) Today: In this tab, you can see today’s booking info.
b) Upcoming: Under this tab, you can see all the upcoming booking info and make the plan accordingly.
c) New: Under this tab, you can see all the recent bookings that are pending approval or any other action. Like – Cancel, Delete, Accept, Reject or Mark as completed.
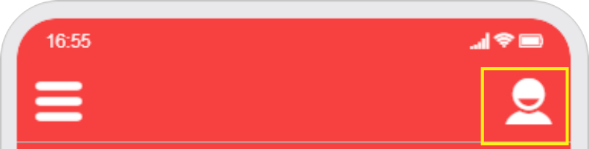
4) By click on account icon top right side of the screen you can again switch the account type or edit the information and able to see the appointments and classes bookings info.
Google Calendar Sync
Google calendar Sync allows you to Sync your app appointments with google calendar and the app service provider can able to see all the appointment on google calendar too. It will help to serve better and avoid missing the appointments and delivery of your services. It’s working on one-way sync ‘app to google calendar’.
Below are steps to set up google calendar Sync with your app
Step 1: Access your account google account via this link https://console.cloud.google.com
next a) select your project via clicking on the drop-down menu under the header section of the active page.
![]()
Select your project from the pop-up window

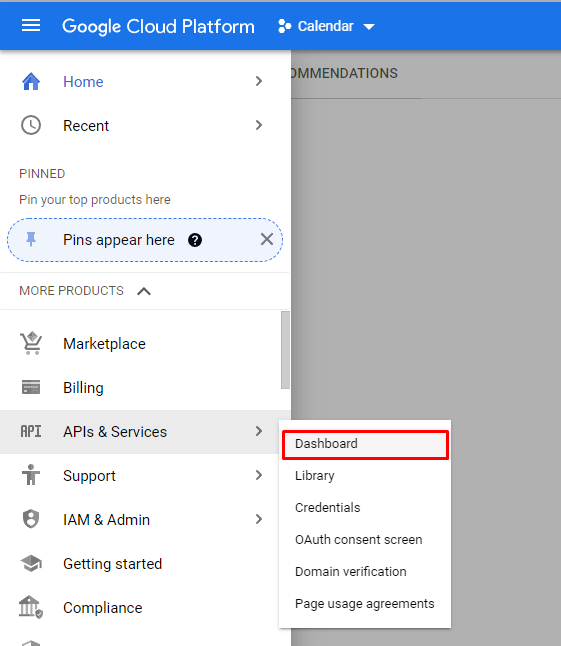
Step 2: Next click on menu icon top left side of the screen then go to APIs & Services then select the credentials option in the sub-menu.
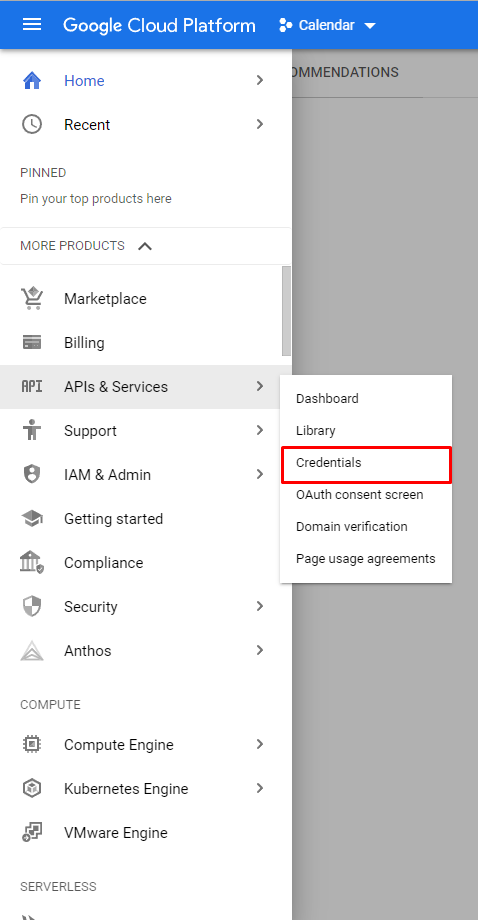
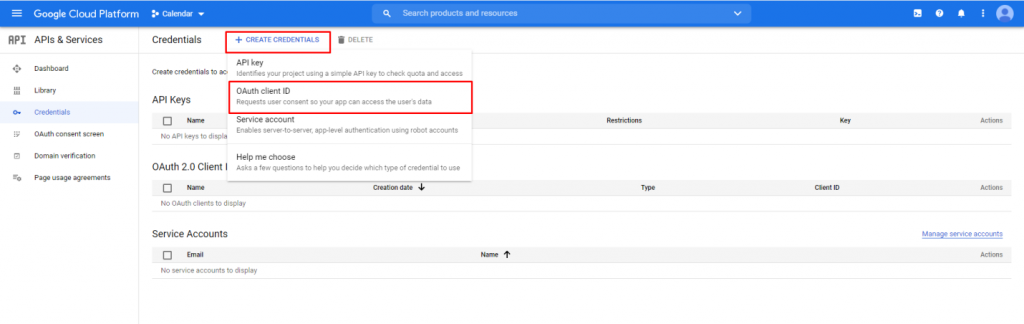
Step 3: Under the credentials screen, click on the ‘Create Credentials’ tab then select the OAuth Client ID option under the dropdown menu.
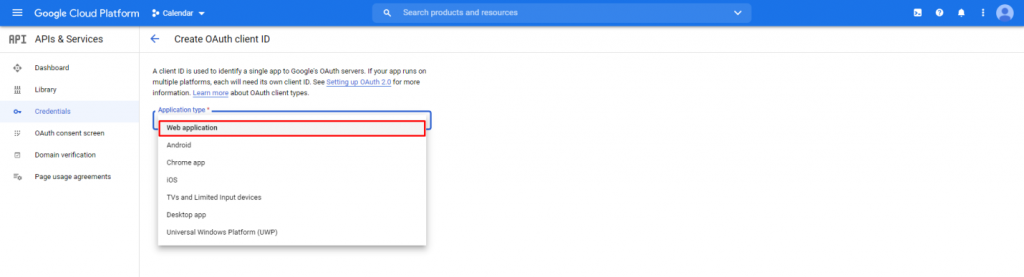
Step 4: a) Under the ‘Create OAuth client ID’ screen you need to select the application type. Select the web application as an application type or you may select anyone as per your requirement.
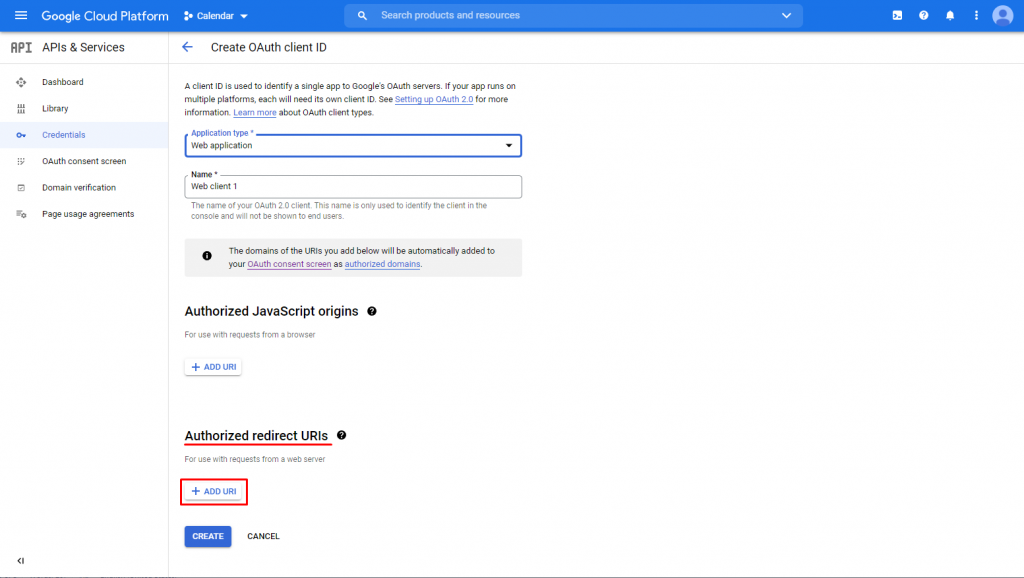
b) After selecting the application type next click on the ‘+ADD URL’ button under ‘Authorized redirect URIs’
c) Go to your SiberianCMS application feature tab then select the appointmentpro module.
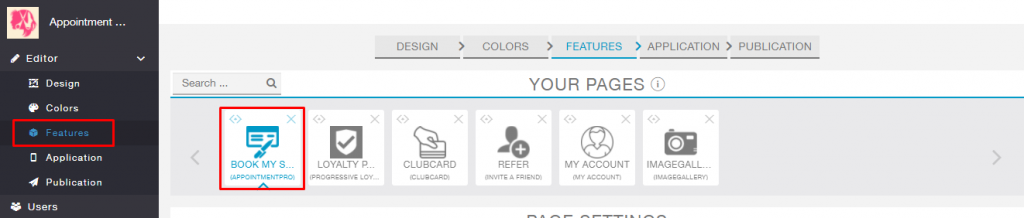
# Next select the settings tab
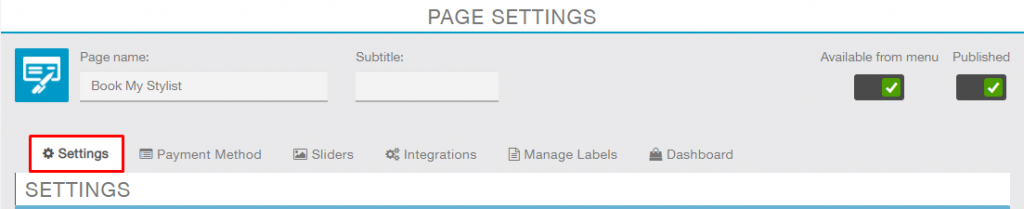
# Next scroll down the page then go to ‘Google calendar credentials section’. Under you can find the ‘Google App Redirect URL’ copy it from here.
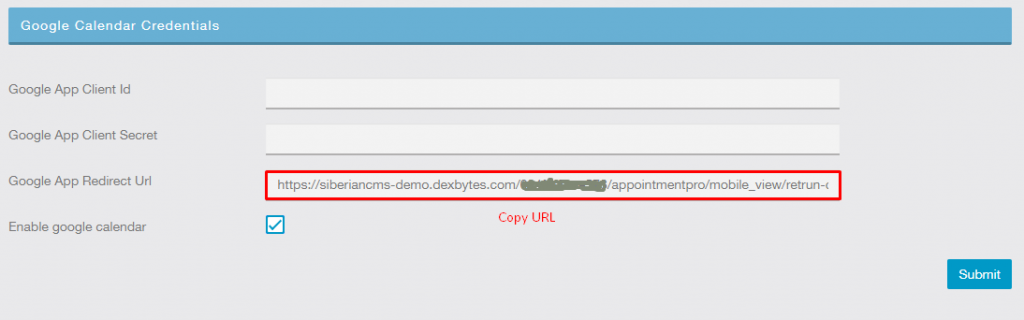
d) Again come to the ‘Create OAuth client ID’ page and paste the copied URL under ‘Authorized redirect URIs’ then hit on the create button.
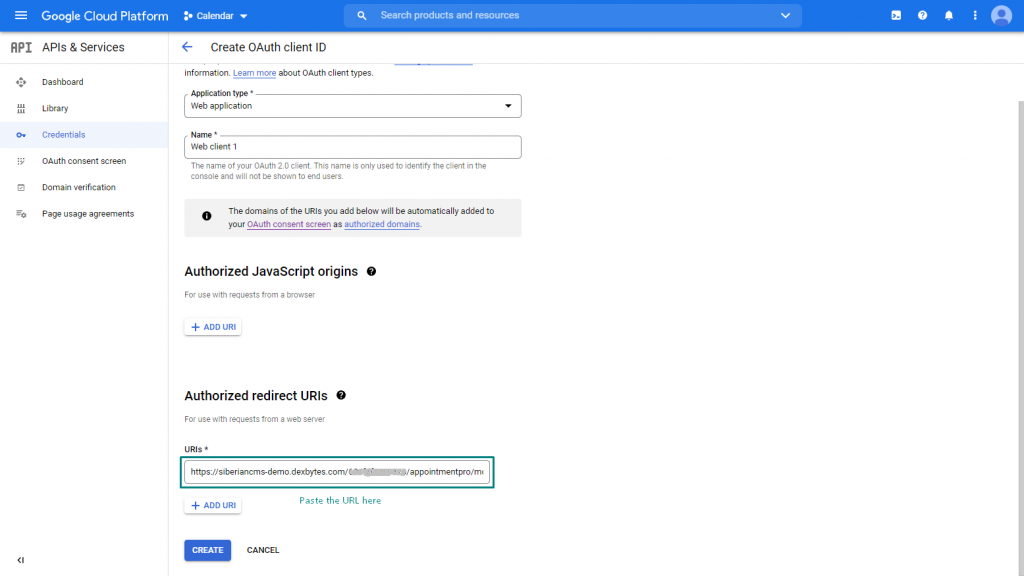
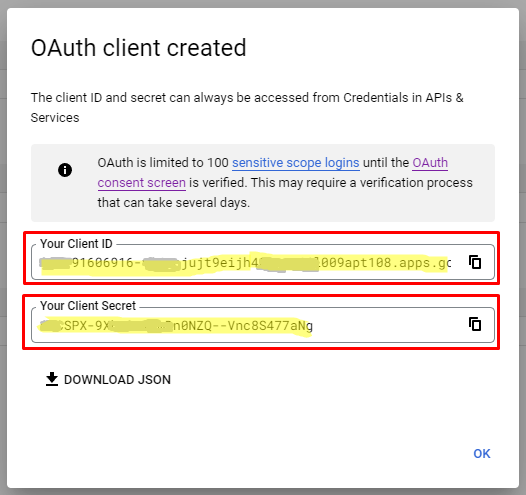
# the pop-up window will be open ‘OAuth client created’. You need to copy both the IDs Client ID as well as Client secret.
e) Once again go to the ‘Google calendar credentials’ section under SiberianCMS Appointmentpro module. Past copied client ID and Client Secret under the particular fields’ then checkmark on the check box of enable google calendar then click on ‘submit’ button.
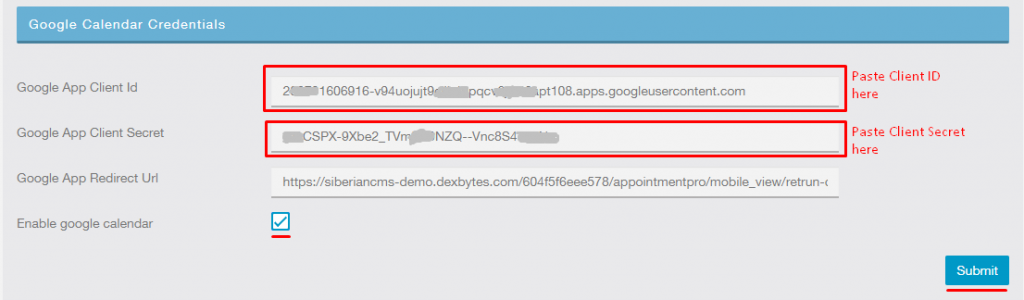
*To enable the google calendar make sure all data entered should be correct and must to filled all the given fields under ‘google calendar credentials’ with check marked ‘enable google calendar’.
Step 5: a) Next click on menu icon top left side of the screen then go to APIs & Services then select the ‘Dashboard’ option in the sub-menu.
b) Next click on “+ ENABLE APIS AND SERVICES” button under the header section on the top of the page.

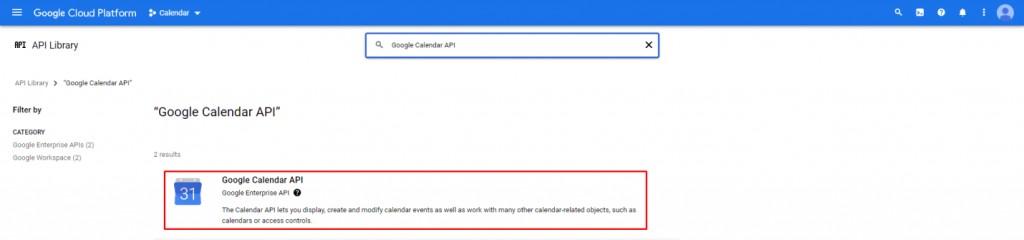
c) As your reach the API Library page. You need to enter the text “Google Calendar API” under the search box and hit the ‘Enter’ key on your keyboard to search the API.

d) Click on the ‘Google Calendar API’ among showing the list of results.
e) Then click on the ‘Enable’ Button to activate the API that it.

How to connect and check google calendar integration
*Google calendar integration supports browser access to connect with the system.
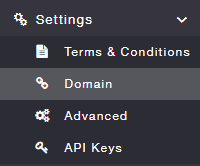
First access Siberian cms and click on the settings tab under the side menu section then select the ‘Domain’ option from the sub-menu of the settings tab.
Click on the WebApp link to access the app via browser.

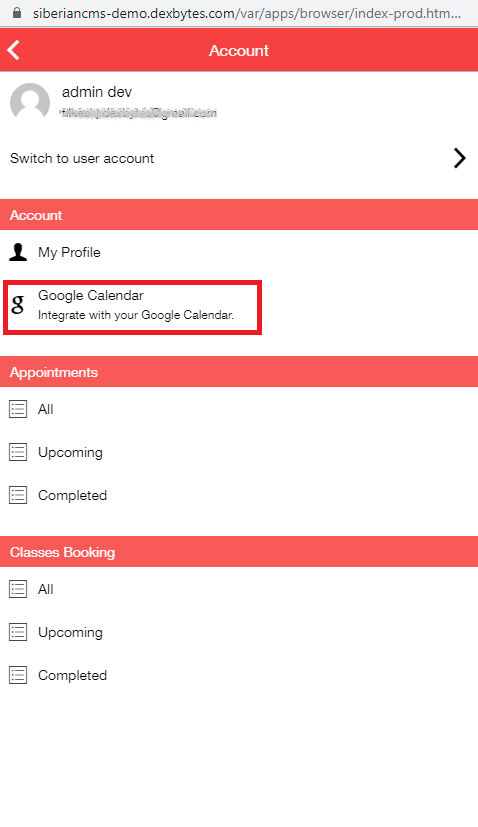
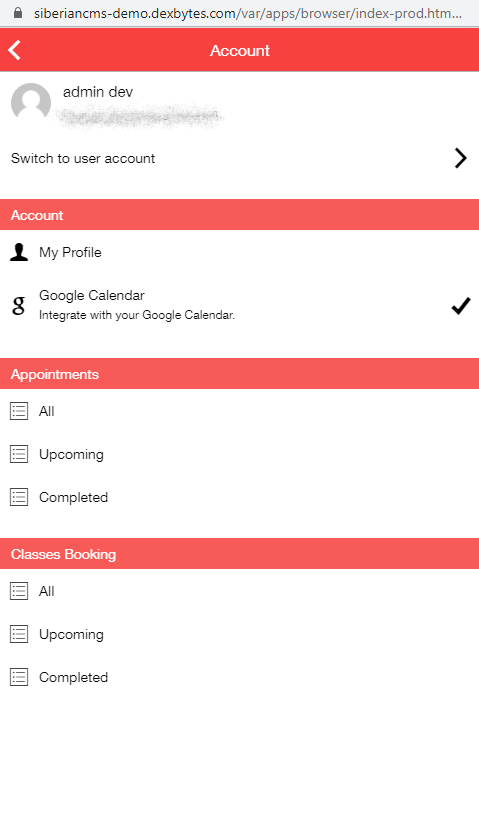
As click on the WebApp link new browser tab will be open and you are able to access the app via browser. You need to click on the face icon located on top right side of the app screen. Then access the account page. Next Click on the ‘Google Calendar’ menu under the account tab of the page.
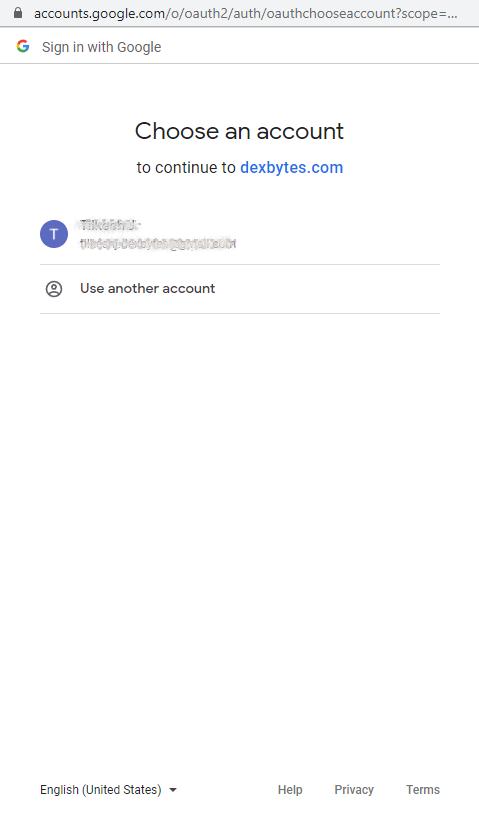
It will redirect to the google login page, you need to log in with the same account as the service provider in the app.
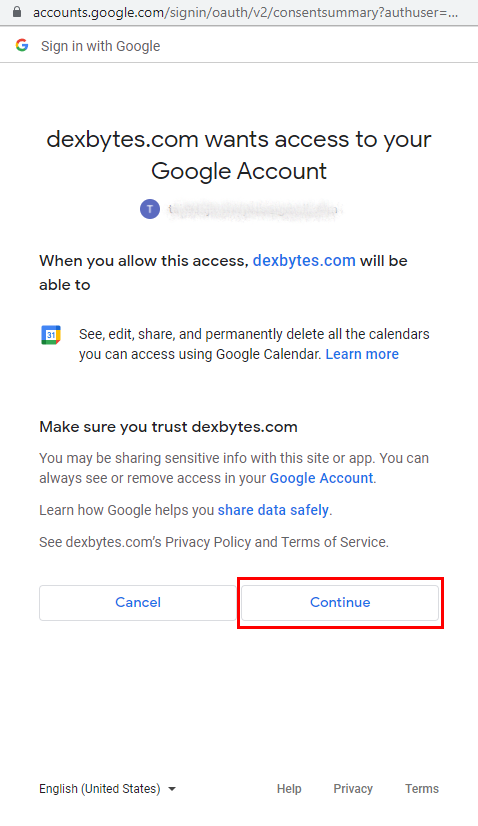
Click on the ‘Continue’ button to connect your Gmail calendar with your Siberian cms app.
You can see the right tick on the right side of Google Calendar text it means your Integration is done successfully.
Checklist
1) Make sure that the service provider’s email ID should be the same. Only google associated email addresses are considerable for google calendar sync.
2) Make sure Credentials should be generated and entered correctly under the ‘Google Calendar Credentials’ section of the Appointment pro module’s settings tab.
3) Make sure you have ‘Enable’ the Google Calendar API.
4) Make sure you have integrated the google calendar via browser.
Well done you are good to go..!
Wow, now you can able to see all your appointment on your google calendar too.
Price: 1-year support & updates – 99€
Note: Before installing this module you need to install Appointment-Pro Module first. It’s an add-on module that extends its power by allowing Class bookings, Manager/Provider control booking from mobile.